LabVIEW is sadly not widely used in the maker world. Lets change that! Due to my professional background, I have worked on a bunch of LabVIEW projects and, therefore, I am quite fast with it compared to text-based programming languages. With the Community Edition of LabVIEW, which is free for non comercial use, National instrumetnts made it accessable for Hobbyists.
The goal of this project was to create simple software capable of acquiring the data stored on the CO² Datalogger that we built in a previous project and displaying the data in graphs. I decided to make a separate graph for each parameter and one where all the parameters are visible at once. The software would be too big to write about all the little functions, so in this tutorial, we focus on the major parts of the project. If you are starting out with LabVIEW.
UI Overview
Get Data Button – Acquires all the data stored on the logger’s SD card and updates the graphs.
Stop Button – Closes the serial connection to the µC and stops the main loop.
Export CSV Button – Exports the data that is present in the graphs into a CSV file. This file can be used to import the data into Excel.
Delete Data Button – Sends a delete command to the µC which then deletes the log file on the SD card.
Code

When we open the main VI, we see the main structure of the code, a Queued Message Handler. It consists of an Event Handling Loop (top) and a Message Handling Loop (bottom).
There are two primary ways a case in the Message Handling Loop is called. The first option is to use the Enqueue Element VI to call all cases required for the initialization (Init), which usually occurs immediately after the VI starts running. The second option is via the Event Handling Loop. When an event occurs, such as a button being pressed, the corresponding Event Case gets called. Within the Event Case, we find the same Enqueue Element VI, which then sends a message or command to be processed by a specific case in the Message Handling Loop.
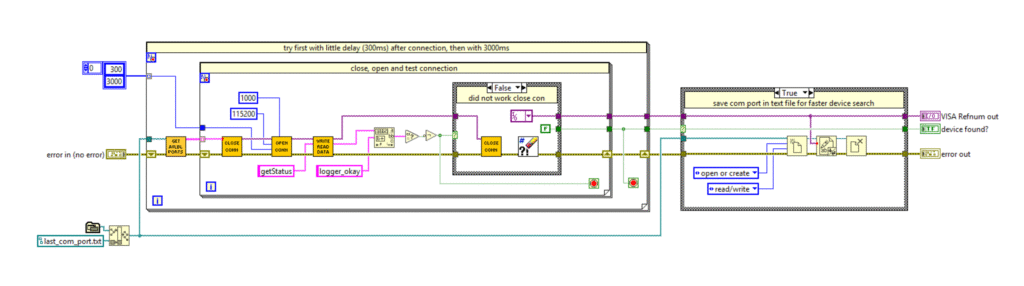
nother code snippet that is worth discussing is in the find_device.vi. It always bothered me to select the microcontroller’s COM port manually, so that’s why I created this VI. It basically tries every available COM port one after another with the status command “getStatus” until it gets the correct message back (the µC sends “logger_okay” over serial).
Some Arduino boards cannot instantly respond to a serial command when a serial connection is established. This is because on the Arduino UNO R3, for example, a reset is performed via the FT232 chip when a serial connection is established. The board then enters the bootloader phase, which lasts a few seconds. We want the fastest connection establishment, so therefore I added a For Loop which first tries to connect with only a 300 ms delay, and if this does not work, it tries again with a 3000 ms delay.
To further enhance the speed of the COM port search, the COM port from the last successful execution is read from a text file, and this port will be tried first. The last thing this VI does is to store the COM port in the same text file if the connection was successful.
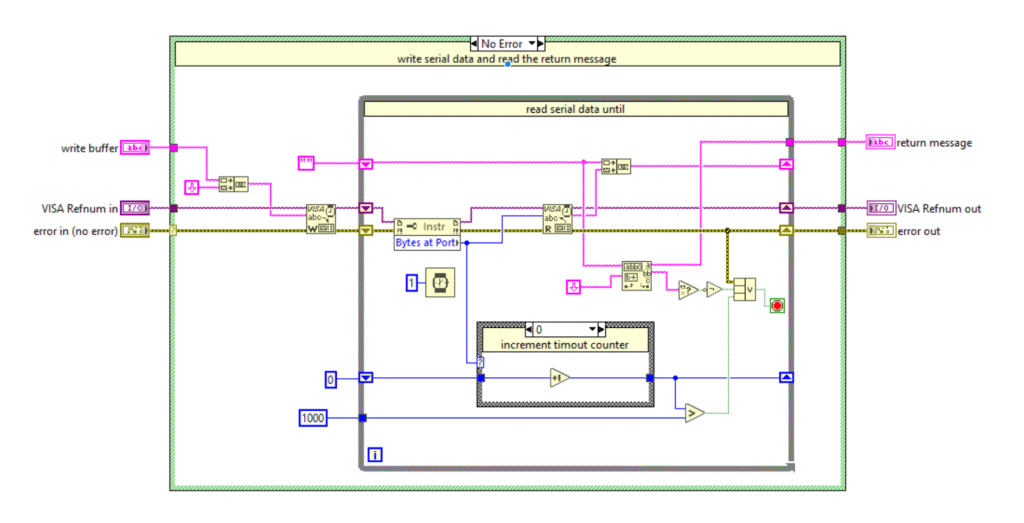
A crucial VI is also the writeReadData.vi. It is used to send a command to the µC and read the response. Over the years I have tried multiple methods of writing and reading over serial. There might be a better method of doing this, but it works well for me.
The VI adds a line feed constant to the command that is being sent. This line feed is the indicator for the µC to know when the command message is complete.
After sending, the VI goes into the read loop where it will read until either the incoming message has a line feed in it, the timeout is reached (1000 ms), or an error occurred.
Download the project from Git: https://github.com/ThomasStaeudelmayr/Co2_data_logger